Connecting Snowflake and GitHub is the first real step toward modernizing your data workflows. This is how you bring version control to everything—SQL scripts, dbt models, and even infrastructure code.
What you're really doing is creating a single source of truth. It’s the move that gets your team away from risky manual updates and into a reliable, automated system. It’s how you start applying battle-tested software engineering practices to the world of data analytics.
Why Integrate Snowflake with GitHub
At its heart, a Snowflake GitHub integration is all about bringing structure and safety to your data operations. Without it, you're probably living in a world of chaos. Data teams often work in silos, editing SQL scripts on their local machines with no clear history of who changed what, or why. That manual approach isn't just slow—it's riddled with risk and makes collaboration nearly impossible.
The moment you connect Snowflake to a GitHub repository, those problems start to fade away.
Every single change to a stored procedure, a dbt model, or a data pipeline configuration gets tracked. This creates a transparent audit trail, which isn't just a "nice-to-have"—it's often essential for governance and compliance.
To give you a clearer picture, here’s a quick rundown of the immediate wins for your data team.
Integration Benefits at a Glance
| Benefit | Impact on Data Workflows | Practical Example |
|---|---|---|
| Version Control | Every change is tracked, creating a full history. No more "who changed this?" mysteries. | A bug appears in a report. You use git blame to see the exact line of SQL that changed, who changed it, and when, allowing for a quick fix. |
| Collaboration | Teams can work on separate branches without overwriting each other's work. Enables code reviews. | An analyst and an engineer both modify the same SALES_AGGREGATE view. They work on separate branches, then merge their changes safely via a pull request. |
| Automation (CI/CD) | Automatically test and deploy changes, moving from manual uploads to a push-button process. | Merging a pull request to the main branch automatically triggers a GitHub Action that deploys the updated SQL view to your production Snowflake environment. |
| Reliability | Drastically reduces human error by enforcing tests and reviews before code hits production. | An automated test (like a dbt test) runs on every pull request, catching a NULL value in a key column before it can be deployed and break a dashboard. |
| Governance | Provides a complete, auditable trail of every modification for compliance and security. | During a compliance audit, you can instantly provide a complete history of every change made to your financial reporting tables over the last year. |
This table just scratches the surface, but it highlights the fundamental shift from ad-hoc processes to a structured, professional workflow.
Streamlining Team Collaboration
Let's get practical. Imagine two data engineers need to tweak the same critical sales reporting view. Without version control, one person could easily overwrite the other's work without even knowing it. The result? Broken dashboards, bad reports, and a very stressful morning.
With a proper integration, both engineers work on separate branches in GitHub. They can develop their changes in parallel without stepping on each other's toes. When they're done, they submit a pull request, which forces a peer review before anything gets merged and deployed to Snowflake. This simple process catches bugs early and ensures the quality of your code is always improving.
For a deeper dive into managing collaborative projects, our guide on setting up a dedicated GitHub MCP server offers some great additional context.
The Power of Automation and Reliability
The real magic happens when you pair version control with automation. This integration is the backbone for building a real CI/CD (Continuous Integration/Continuous Deployment) pipeline for your data assets.
- Faster Deployments: You can set up workflows to automatically deploy changes to your Snowflake environment the moment code is merged into a specific branch. This cuts deployment time from hours to minutes.
- Higher Quality Code: Enforce code reviews and automated testing before anything gets near production. This means you catch errors long before they can impact your business users.
- Improved Governance: You get a complete, auditable history of every single change made to your database objects, showing exactly who changed what and when.
A well-structured workflow moves your team from "I think this is the latest version of the script" to "I know this is the exact version running in production because it's on the main branch." That shift is huge for building confidence and operational excellence.
Recently, Snowflake rolled out a native integration with Git repositories, with a special focus on dbt (data build tool). This is a game-changer. It simplifies data engineering workflows by letting teams pull code directly from Git and run dbt transformations entirely inside Snowflake, eliminating the need for external schedulers or compute.
This consolidation slashes complexity, deployment time, and security risks. You can learn more about how Snowflake's native dbt support is changing data workflows and see what it could mean for your team.
Right, before we even think about writing a single line of YAML, let's talk about setup. It's tempting to just jump in and start coding, but trust me, a little prep work now will save you a world of hurt later. A solid Snowflake GitHub integration is built on a smart foundation.
Getting this foundation right is all about being deliberate. We need to think through how we're structuring our environment to make it secure, scalable, and easy for anyone to understand. This means sorting out Snowflake roles, organizing your GitHub repo, and deciding on a branching strategy that actually makes sense for your team. Think of it as drawing the blueprint before you start knocking down walls.
Setting Up Roles and Permissions
First things first: create a dedicated service account in Snowflake for your automation. Whatever you do, never use a personal user account for your CI/CD pipeline. The whole point here is to stick to the principle of least privilege. You want to give this account just enough permission to do its job, and not an ounce more.
This means you’ll be creating a custom role with very specific grants. For example, if your pipeline is only supposed to deploy views into the REPORTING schema, then that's all it should be able to do. The role would get USAGE on the database and warehouse, and CREATE VIEW on that one specific schema. It absolutely should not have a powerful role like SYSADMIN.
Here's a practical SQL example of creating such a role:
-- Create a dedicated role for the CI/CD process
CREATE ROLE GITHUB_DEPLOYER;

-- Grant usage on the target database and schema
GRANT USAGE ON DATABASE PROD_DB TO ROLE GITHUB_DEPLOYER;
GRANT USAGE ON SCHEMA PROD_DB.ANALYTICS TO ROLE GITHUB_DEPLOYER;

-- Grant specific permissions needed for deployment
GRANT CREATE VIEW ON SCHEMA PROD_DB.ANALYTICS TO ROLE GITHUB_DEPLOYER;
GRANT CREATE TABLE ON SCHEMA PROD_DB.ANALYTICS TO ROLE GITHUB_DEPLOYER;

-- Grant warehouse usage
GRANT USAGE ON WAREHOUSE COMPUTE_WH TO ROLE GITHUB_DEPLOYER;

-- Create the service user and assign the role
CREATE USER GITHUB_SVC_USER PASSWORD = 'a-very-strong-password';
GRANT ROLE GITHUB_DEPLOYER TO USER GITHUB_SVC_USER;

-- Set the default role and warehouse for the user
ALTER USER GITHUB_SVC_USER SET DEFAULT_ROLE = GITHUB_DEPLOYER;
ALTER USER GITHUB_SVC_USER SET DEFAULT_WAREHOUSE = 'COMPUTE_WH';
A tightly scoped service account is your first line of defense. If its credentials are ever compromised, the potential damage is contained to a very small, specific area of your data warehouse.
Structuring Your GitHub Repository
A clean, organized repo is a happy repo. As your project gets bigger, a messy structure will become a nightmare to navigate. The key is to organize your files into directories that clearly state their purpose.
A pretty standard and effective structure I've used on many projects looks something like this:
.
├── .github/
│   └── workflows/
│       └── deploy-to-snowflake.yml  <-- Your CI/CD pipeline definition
├── dbt_project/
│   ├── models/
│   │   └── marts/
│   │       └── core/
│   │           └── fct_orders.sql   <-- Your dbt models
│   └── dbt_project.yml
├── sql/
│   └── views/
│   │   └── v_user_activity.sql      <-- Your plain SQL scripts
└── README.md
- /sql: This is where all your raw SQL scripts live—things like stored procedure definitions or DDL for views.
- /dbt_project: If you're a dbt user, you know this one. It’s the home for your models, seeds, and tests.
- /.github/workflows: GitHub Actions requires this specific folder for all your workflow
.ymlfiles.
This kind of logical separation makes it dead simple for anyone on your team to jump in, find what they need, and understand how the project is put together. While you're at it, you might want to look into how a dedicated https://findmcpservers.com/server/mcp-snowflake-server could help organize how your various tools interact with your Snowflake data.
Building Your First CI/CD Pipeline with GitHub Actions
Alright, with all the groundwork laid, it's time for the fun part: bringing your Snowflake GitHub integration to life. We're moving from theory to practice and building a CI/CD pipeline using GitHub Actions. The goal is pretty straightforward—automate the deployment of SQL changes directly to Snowflake anytime code gets merged into a specific branch, like main.
The heart of this whole operation is a workflow file written in YAML. This little file lives in your repository and is basically a set of instructions telling GitHub Actions what to do and when. Think of it as the recipe that powers your entire DataOps process.
This diagram gives you a bird's-eye view of the setup we've done so far—creating the repo, generating tokens, and setting up roles—which are all prerequisites for the pipeline itself.
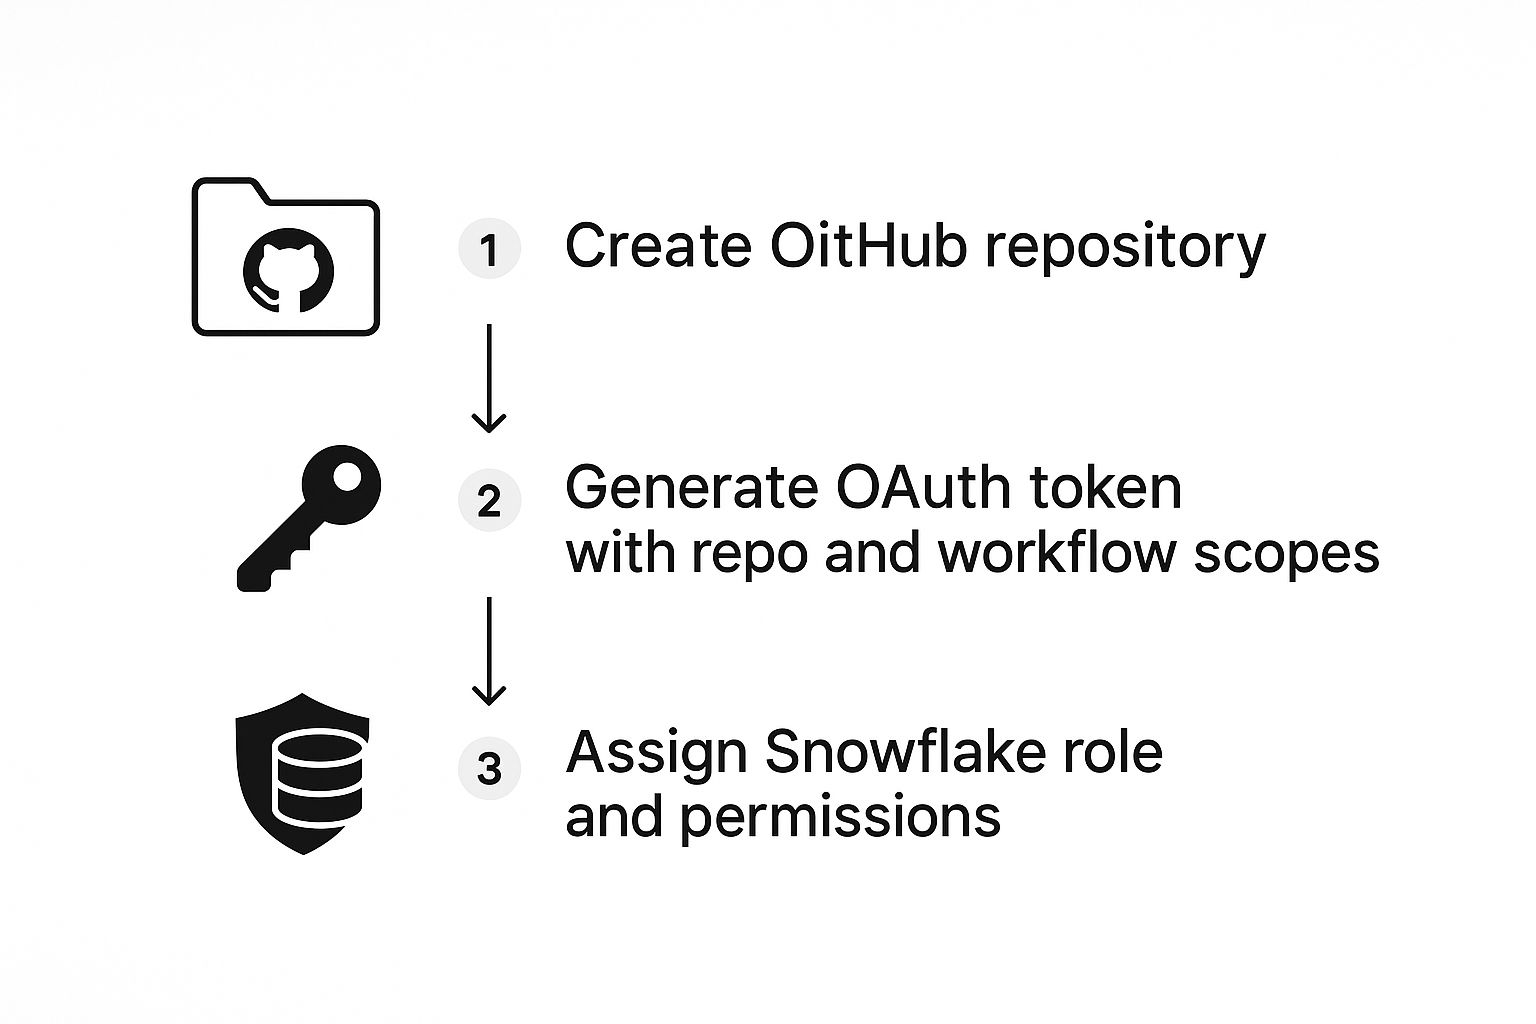
As you can see, we're taking a security-first approach. Every step, from the repo setup to the Snowflake permissions, is built on the principle of least privilege.
Securing Credentials with GitHub Secrets
First things first: we need to handle our credentials safely. Never, ever hardcode your Snowflake password or private key directly into a YAML file. That's a massive security hole waiting to be exploited.
Instead, we'll use GitHub Encrypted Secrets. It's a feature built specifically for stashing sensitive stuff like API keys and passwords.
You can find this in your repository's settings under Security > Secrets and variables > Actions.
Here are the secrets you'll need to create. These correspond to the service account and environment we set up earlier.
SNOWFLAKE_ACCOUNT: Your Snowflake account identifier (e.g.,xy12345.us-east-1).SNOWFLAKE_USER: The username for our deployment service account.SNOWFLAKE_PASSWORD: The password for that service account.SNOWFLAKE_WAREHOUSE: The warehouse the pipeline will use to run queries.SNOWFLAKE_DATABASE: The database you're deploying changes to.SNOWFLAKE_SCHEMA: The specific schema you're targeting.
By using secrets, we can reference these credentials in our workflow without ever exposing the actual values in our code. It's a clean, secure way to manage access.
Crafting the GitHub Actions Workflow
Now we're ready to build the workflow. In your repository, create a new file at this exact path: .github/workflows/deploy-to-snowflake.yml. The path is important, as it’s where GitHub automatically looks for action files.
This YAML file will define the triggers, jobs, and steps for our pipeline. We’ll set it up to run automatically every time a push is made to the main branch.
Our workflow is going to do two simple things:
- Checkout Code: It starts by pulling the latest version of your code from the repository.
- Deploy SQL: Then, it uses a handy community-built action to connect to Snowflake and run all the
.sqlfiles it finds in our/sqldirectory.
This simple "trigger-and-deploy" model is incredibly powerful. It means a successful pull request merge into
mainis all it takes to deploy a new view, update a stored procedure, or alter a table. You’re turning a manual, error-prone task into a completely hands-off process.
Here is a complete, commented example of what your deploy-to-snowflake.yml file should look like. You can copy this and adapt it for your own project.
# A friendly name for your workflow, which shows up in the "Actions" tab.
name: Deploy SQL to Snowflake

# This section defines the trigger. We're telling it to run on any push to 'main'.
on:
  push:
    branches:
      - main

# Jobs are the sets of steps that get executed.
jobs:
  deploy-sql-changes:
    # This specifies the virtual machine to run the job on. 'ubuntu-latest' is a solid default.
    runs-on: ubuntu-latest
    steps:
      # Step 1: Check out the repository's code.
      # This is a standard action that lets the workflow access your SQL files.
      - name: Checkout repository
        uses: actions/checkout@v3

      # Step 2: Deploy to Snowflake.
      # Here we use a community action built for running Snowflake queries.
      - name: Snowflake SQL Deploy
        uses: aaron-soto/snowflake-sql-action@v2.2.0
        with:
          # We're referencing the secrets we created earlier.
          snowflake_account: ${{ secrets.SNOWFLAKE_ACCOUNT }}
          snowflake_username: ${{ secrets.SNOWFLAKE_USER }}
          snowflake_password: ${{ secrets.SNOWFLAKE_PASSWORD }}
          snowflake_warehouse: ${{ secrets.SNOWFLAKE_WAREHOUSE }}
          snowflake_database: ${{ secrets.SNOWFLAKE_DATABASE }}
          snowflake_schema: ${{ secrets.SNOWFLAKE_SCHEMA }}

          # This tells the action where to find the SQL files to run.
          sql_folder_path: "sql/"
This workflow file is the engine of your automation, creating a direct, version-controlled link between your GitHub repository and your live Snowflake environment. Once you commit this file, your pipeline is officially active.
Advanced Automation for Data Ingestion
Alright, once you've got a basic CI/CD pipeline humming along, it's time to think bigger than just deploying SQL scripts. The real magic of a Snowflake GitHub integration is its power to conduct entire data ingestion and transformation symphonies. Your repository can become the central control plane for your whole data lifecycle.
This is all about closing the gap between your code and your live data operations. Instead of just pushing a new view, your GitHub workflow can now trigger the loading of fresh data, kick off transformations, and serve it up for your analytics or AI models—all in one automated shot.
Building Event-Driven Ingestion Pipelines
Let's walk through a real-world scenario. A developer needs to bring in a new data source. They commit a new dbt model and its config file to a feature branch. As soon as that branch gets merged into main, the GitHub Action springs to life, doing much more than just a simple deployment.
You can set it up to perform a whole sequence of steps:
- Deploy the Model: First things first, the action runs
dbt runto get the new or updated transformation logic into Snowflake. - Trigger Data Loading: Next, the workflow fires off a command to kickstart a Snowpipe, Snowflake's service for continuous data ingestion. This tells it to start pulling in raw files from an S3 bucket or Azure Blob Storage.
- Run Transformations: Finally, with the raw data loaded, the action runs the new dbt model against it, populating your final reporting tables.
This event-driven approach is a game-changer. It means your code changes are always perfectly in sync with the data they're designed to process. No more manual handoffs between developers and data engineers—just a smooth, seamless flow from a commit all the way to production-ready data.
Incorporating Snowpark for Complex Logic
What about when SQL just isn't enough? That's where Snowpark comes in. You can easily integrate it into your GitHub Actions for more complex data processing. Snowpark lets you write your transformations in Python, Java, or Scala, and it all executes directly inside Snowflake's engine.
Your GitHub Actions workflow can be configured to run a Python script using Snowpark. This is perfect for heavy-duty tasks like data cleansing, feature engineering for ML models, or even calling external APIs to enrich your data.
For example, a merge could trigger a workflow that runs this Python script:
# A simplified Snowpark example script (run_feature_eng.py)
from snowflake.snowpark.session import Session
import os

def main(session: Session):
    # Load customer data
    df_customers = session.table("RAW_CUSTOMERS")

    # Perform feature engineering - e.g., calculate customer lifetime value
    df_features = df_customers.group_by("CUSTOMER_ID").agg(...) # Complex logic here

    # Save the results
    df_features.write.mode("overwrite").save_as_table("CUSTOMER_FEATURES")

if __name__ == "__main__":
    session = Session.builder.configs({
        "account": os.getenv("SNOWFLAKE_ACCOUNT"),
        "user": os.getenv("SNOWFLAKE_USER"),
        # ... other connection params
    }).create()
    main(session)
A simple code merge could trigger a workflow that executes this script to pull data, process it with Snowpark, and land the clean results right back in a Snowflake table.
By combining GitHub Actions with Snowpark, you're not just deploying SQL—you're deploying entire data applications. This opens up a world of possibilities for automating everything from simple ETL jobs to the operational pipelines that feed your AI and machine learning initiatives.
A really interesting development here is Snowflake's new Openflow service. Announced at Snowflake Summit 2025, Openflow is a multi-modal ingestion service built to radically improve how data moves and integrates, especially within GitHub-based workflows. The goal is to automate pipeline creation, slash the manual work of ingestion, and even let you build pipelines using natural language. It's all about speeding up how teams integrate data for AI. You can get more details on how Openflow unlocks data interoperability on Snowflake.com. This promises to make the connection between your code and your live data even tighter.
Essential Security Practices for Your Workflow
Automating your data workflows is a game-changer, but it also opens up new avenues for security risks. When you have a powerful Snowflake GitHub integration, you need equally powerful security measures to back it up. A single exposed credential could unravel your entire data platform, making robust security an absolute must-have, not just a nice-to-have.
The most common—and frankly, most dangerous—mistake I see teams make is hardcoding credentials directly into their workflow files or scripts. This is a ticking time bomb.
Instead, you need to be using GitHub Encrypted Secrets for everything sensitive. This includes your Snowflake username, password, and especially your private key. This simple practice ensures your credentials are never exposed in your codebase, even to team members who have repository access.
Protecting Your Production Branch
Your main or production branch is the source of truth for your live environment. You have to treat it like a vault. Direct pushes to this branch should be completely off-limits.
The best way to lock it down is with GitHub's branch protection rules.
Setting these up is straightforward and adds critical layers of defense. For any production-level branch, I always recommend enabling these rules:
- Require a pull request before merging. This simple rule shuts down direct commits and forces a formal review process for every single change.
- Mandate at least one code review. Getting a second pair of eyes on every change is invaluable for catching errors, spotting bugs, and identifying potential security holes before they hit production.
- Require status checks to pass before merging. This is your automated gatekeeper. You can configure it to block any merge until your CI pipeline—including all tests and security scans—runs and passes successfully.
This setup transforms your main branch from a potential free-for-all into a carefully guarded asset, effectively preventing both accidental deployments and malicious changes.
Security isn't a final step you tack on at the end; it's a mindset that has to be woven into your workflow from the very beginning. By protecting your branches and managing secrets properly, you build a resilient process that truly protects your most valuable data assets.
Shifting Security Left with Automated Scanning
The best time to catch a security vulnerability is long before it ever gets merged into your main codebase. This "shift-left" approach is all about finding and fixing issues early in the development cycle, where they're cheapest and easiest to resolve.
A fantastic way to do this is by plugging an automated secret scanning tool directly into your CI pipeline.
Tools like GitGuardian can be added as a step in your GitHub Actions workflow. Every time a developer opens a pull request, the scanner automatically inspects the code for any accidentally committed secrets, like API keys or passwords. If it finds one, the check fails, and the pull request is blocked from being merged until the credential is removed.
Here's a practical example of adding it to your workflow YAML:
      # ... other steps like checkout
      - name: GitGuardian Scan
        uses: GitGuardian/ggshield-action@v1
        env:
          GITHUB_PUSH_BEFORE_SHA: ${{ github.event.before }}
          GITHUB_PUSH_BASE_SHA: ${{ github.event.base }}
          GITHUB_PULL_BASE_SHA: ${{ github.event.pull_request.base.sha }}
          GITGUARDIAN_API_KEY: ${{ secrets.GITGUARDIAN_API_KEY }}
      # ... deploy steps
This automated vigilance is incredibly effective. For instance, Snowflake's own security team used GitGuardian to discover and remediate thousands of exposed secrets in their codebases, cleaning up 50% of them in a very short time. With over 1,800 developers adopting pre-commit scanning, they successfully shifted their security posture left, catching issues before they ever became real risks.
You can get the full story on Snowflake's journey from secrets sprawl to secretless workflows to see just how big of an impact this can have.
Even with the best-laid plans, a few questions always pop up when you're wiring up Snowflake and GitHub. I've put together a quick rundown of the most common ones I hear from teams to help you sidestep potential snags.
Can I Use Other Tools Besides GitHub Actions?
Absolutely. We've focused on GitHub Actions here because it's so tightly integrated, but tools like Jenkins, GitLab CI/CD, or CircleCI are all perfectly capable of doing the job.
No matter which tool you pick, the core concepts don't change. You’ll still need a secure way to handle your credentials, a client like SnowSQL to run commands, and scripts to execute your SQL. The only real difference is the syntax you'll use in your pipeline configuration file.
How Should I Manage Schema Changes and Rollbacks?
Just throwing raw SQL scripts into a folder and hoping for the best is a recipe for disaster. For managing schema changes like a pro, you really want a dedicated database migration tool like Schemachange or Flyway. These tools treat your database schema like code, keeping a versioned history of every change applied to each environment. It’s a game-changer.
When things go wrong and you need to roll back, you have two solid options:
- Undo Scripts: The classic approach. For every "up" script that applies a change, you write a corresponding "down" script to revert it. It's clean, version-controlled, and predictable.
- Snowflake Time Travel: For those heart-stopping moments, you can lean on Snowflake's incredibly powerful Time Travel feature. This lets you rewind a database, schema, or table to a specific point in time before the deployment went sideways.
The real key is having a rollback plan before you need one. Figure out your strategy ahead of time. It’s the difference between a calm, orderly recovery and a full-blown production fire drill.
What Is the Best Way to Handle Different Environments?
A battle-tested strategy is to map your Git branches directly to your Snowflake environments. This creates a super clear, intuitive path for promoting your code.
For instance, a merge to the develop branch could automatically deploy to your DEV Snowflake account, while merging to main triggers a deployment to PROD. Simple and effective.
To keep everything secure, use GitHub Environments. This feature is built for this exact scenario. It lets you create separate buckets of secrets for each environment and even add protection rules, like requiring a manual approval before deploying to production. This ensures your PROD credentials are never accidentally exposed in a dev pipeline. For a deeper dive into managing complex server configurations, check out our spotlight on the GitHub MCP server.
At FindMCPServers, we're all about helping developers connect their AI models to powerful tools and data. Check out our platform to find MCP servers that can give your data-driven applications a serious boost. Visit us at https://www.findmcpservers.com.