When you're staring at a broken webpage, the fix is often just a handful of clicks away. Debugging in Chrome isn't some dark art; it's a systematic process of using a built-in toolkit called DevTools to figure out what's gone wrong. It's about turning that moment of frustration into a manageable process of elimination.
Your First Look at Chrome DevTools
We’ve all been there: you click the 'Submit' button on a form, and... nothing. No confirmation, no error message, just dead air. This is the perfect time to stop guessing and start investigating with Chrome DevTools, your browser's built-in command center for web development.
Opening it is simple. Just right-click anywhere on the page and hit "Inspect," or use the keyboard shortcut Ctrl+Shift+I (on Windows/Linux) or Cmd+Option+I (on Mac). It might look like a lot at first, but don't get overwhelmed. We're just going to focus on a few key areas to solve our broken button problem. The goal isn't to memorize every feature, but to build an investigative mindset.
Your Initial Toolkit
Think of DevTools as a detective's kit. For our broken button scenario, we'd start with three primary tools to get our first clues.
- The Elements Panel: This gives you a live look at the page's HTML and CSS. You can select that 'Submit' button and instantly see its code. Practical example: You might find the button is inside a
<div>with the styledisplay: none;, which explains why it's not visible, or discover a typo in theonclickattribute. - The Console: This is your direct line to the page's JavaScript. If the button is supposed to trigger a script, any errors will almost always scream for attention here. Practical example: A common error is
Uncaught ReferenceError: submitForm is not defined, telling you the function name is misspelled or the script isn't loaded. - The Network Tab: This panel is a log of every request the page makes. A quick look here can tell you if a critical script file failed to load. Practical example: You might see
app.jsin red with a404 Not Foundstatus, which neatly explains why the button's functionality is completely missing.
This methodical approach is what separates a frustrating bug hunt from a structured diagnosis. If you're interested in structuring more complex workflows, our guide on using Visio for process mapping offers some great parallels.
A systematic approach is the core of effective debugging. Instead of asking "Why is my code broken?" start by asking "What is working correctly?" and use DevTools to narrow down the possibilities.
This initial diagnostic step is a fundamental skill for any developer. With Chrome holding over 65% of global browser market share, it’s no surprise that surveys show around 80% of front-end developers rely on it daily. Mastering these first few panels means you're building a skill set shared by a massive community of professionals. You can always dig deeper into other features on sites like dev.to.
To make it even clearer, here’s a quick reference for the essential DevTools panels we’ll be covering.
Key DevTools Panels and Their Primary Use
This table breaks down the main job of each panel we'll be diving into. It’s a great way to quickly remember where to look when a specific type of problem pops up.
| Panel Name | What It Helps You Do |
|---|---|
| Elements | Inspect and edit the live HTML and CSS of your page. Perfect for UI and layout issues. |
| Console | View logs, run JavaScript commands, and find errors thrown by your scripts. |
| Sources | Debug JavaScript step-by-step with breakpoints and inspect variables in real time. |
| Network | Analyze all network requests to see what's loading, how long it's taking, and if anything failed. |
| Performance | Record and analyze runtime performance to identify bottlenecks and optimize your code. |
| Memory | Find and fix memory leaks by taking snapshots of the heap and analyzing memory usage. |
Getting comfortable with these core panels is the first and most important step toward becoming a debugging pro. They provide the evidence you need to solve almost any front-end mystery.
Solving JavaScript Bugs with the Sources Panel
We've all been there, littering our code with console.log() statements, hoping to catch a bug in the act. It’s a classic move, but frankly, it’s like fumbling around in a dark room. The Sources panel is the light switch. This is your command center for real, interactive JavaScript debugging, turning a frustrating guessing game into a precise investigation.
At its core, the Sources panel lets you pause your code right in the middle of its execution to see exactly what's going on. The magic behind this is breakpoints—markers you place on specific lines of code. When the browser hits a breakpoint, it freezes everything, giving you a perfect snapshot of your application's state at that very moment.
This is all it takes to set your first breakpoint. A single click.
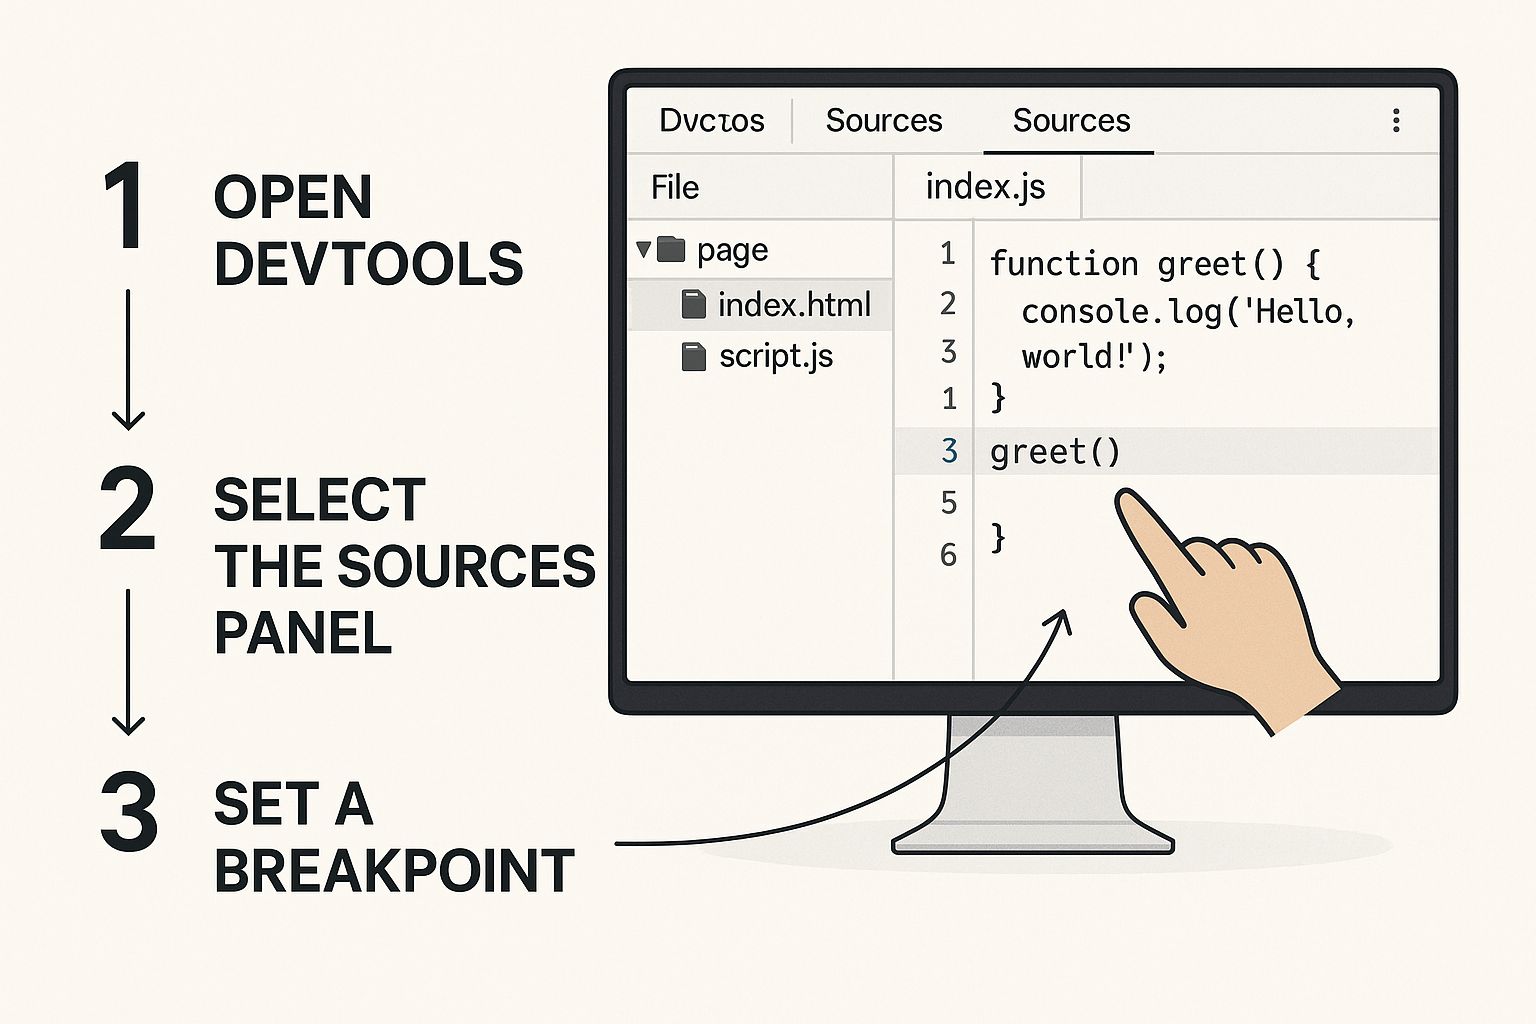
That one action is the gateway to understanding your code's flow, pausing execution right where you need to start digging.
Mastering Breakpoints for Tricky Bugs
Setting a simple breakpoint is easy—just click the line number. But the real power comes from the more advanced tricks, especially for those sneaky bugs that only pop up under specific conditions.
Imagine an e-commerce cart that messes up the total, but only when a certain discount code is used. Logging every single calculation would just create a ton of noise. This is the perfect time for a conditional breakpoint.
Here’s how you’d set it up:
- Jump over to the Sources panel and find the JavaScript file with your
calculateTotal()function. - Locate the line where the final total is calculated.
- Instead of just clicking, right-click the line number and choose "Add conditional breakpoint."
- A small input box will appear. Type in a condition like
discountCode === "SAVE20".
Now, the debugger will only pause when that exact condition is true. It will completely ignore the breakpoint on all other calculations, saving you from clicking through hundreds of irrelevant loops. This approach turns debugging from a blunt instrument into a surgical tool.
Stepping Through Your Code
Once your code is paused, you're in the driver's seat. The Sources panel gives you a set of controls= to move through your code line-by-line, letting you watch how every single statement affects your application.
The most common controls= you’ll use are:
- Step over: Runs the current line and moves to the next one. It won't dive into any functions called on that line, which is great for skipping over code you already trust.
- Step into: If the current line calls a function, this button takes you inside that function, letting you debug it from the beginning.
- Step out: This finishes running the rest of the current function and pops you back out to where it was originally called.
- Resume: Unpauses the code and lets it run freely until it either finishes or hits another breakpoint.
While you're stepping through, a couple of other panes become your best friends.
Analyzing State with Scope and the Call Stack
Pausing the code is only half the story. You need to see why it's doing what it's doing. This is where the Scope and Call Stack panes come into play.
The Scope pane is your window into every variable the code can see at that exact moment. It shows you everything: local variables inside the current function, closure variables, and global variables. In our e-commerce scenario, you could watch the total, discountAmount, and itemPrice variables change with each step, immediately spotting the exact line where a value goes wrong.
The Call Stack is like a breadcrumb trail for your code. It shows you the exact sequence of function calls that got you to this point, helping you trace an error all the way back to its source.
If you find yourself stuck with an error deep inside a nested function, the Call Stack is your map. It lists every function in the execution path, from the most recent one at the top down to the very first script. Clicking any function in the stack instantly transports you to the line where that call was made, showing you its own scope of variables. It’s an incredibly powerful way to understand the context of a bug and figure out where the bad data came from.
Diagnosing Network and API Issues
When your app feels broken but the code looks perfect, the culprit is often hiding in the network layer. This is where your front end talks to servers, APIs, and other resources. For serious debugging in Chrome, the Network panel is your window into every single one of these conversations, showing you what’s being requested, what’s coming back, and exactly where things are going wrong.
Let's walk through a classic, frustrating scenario: a user profile page gets stuck on an infinite loading spinner. You’ve double-checked the JavaScript, and the logic to fetch user data looks solid. This is a tell-tale sign of a network or API problem.
Isolating the Problem Request
The first thing you’ll notice in the Network panel is a waterfall of requests for images, scripts, and stylesheets. It can be a lot to take in. To cut through the noise, you need to filter for the specific API call that’s failing.
Most modern apps use Fetch or XHR (XMLHttpRequest) to pull data from APIs. The Network panel has a slick filter bar right at the top. Just click on Fetch/XHR to instantly hide all the other resource types and see only the data requests. Suddenly, that long list becomes much more manageable.
In our scenario, you'd probably spot a request to an endpoint like /api/user/123. This is our prime suspect. Clicking on it opens up a detailed view with several tabs: Headers, Payload, Preview, and Response.
The status code is your first and most important clue. A green 200 OK means the server got the request and sent back a successful response. Anything else, especially red status codes like 404 Not Found or 500 Internal Server Error, points directly to the problem.
A 404 error means your front-end code is calling an endpoint that doesn't exist. Maybe there’s a typo in the URL, or a backend route has changed. A 500 error, on the other hand, tells you the server itself crashed while trying to process your request. This isn't a front-end bug, but now you can give your backend team the exact information they need to fix it.
Inspecting Headers and Payloads
What if the status is 200 OK but the spinner is still spinning? Now the problem is likely in the data itself. Two tabs become absolutely critical here: Payload and Response.
- Payload: This tab shows you precisely what data your application sent to the server. Practical example: If you're updating a user's profile, you can check the payload to confirm you're sending
{"email": "test@example.com"}and not an empty object. - Response: This shows the raw data the server sent back. Is it empty? Is it in a different format than your JavaScript expects? Practical example: Your code might expect
{ "userName": "Jane" }, but the server is sending back{ "name": "Jane" }. This mismatch would cause your UI to fail, and the Response tab would make it instantly obvious.
Getting these data structures right is crucial, especially with complex third-party systems. For instance, developers working with Google's services will find our deep dive on the Google API Distance Matrix helpful for understanding how these data exchanges are structured.
Simulating Real-World Conditions
Finally, one of my favorite features for building resilient apps is network throttling. Your app might run flawlessly on your super-fast office Wi-Fi, but what about a user on a shaky 3G network?
At the top of the Network panel, there's a dropdown that defaults to "No throttling." You can change this to presets like "Slow 3G" or "Fast 3G." Reloading the page with throttling enabled shows you exactly how your application behaves under poor network conditions. It helps you pinpoint which resources are taking too long to load and where you might need to add better loading states or optimize assets. This simple step can make a world of difference to the user experience for people on less-than-ideal connections.
Optimizing Website Speed with the Performance Panel
A slow website doesn't just annoy users; it actively drives them away. When your page feels sluggish or janky, the Performance panel is your secret weapon for finding and squashing the bottlenecks that are holding you back.
This isn't just about chasing perfect speed scores. It's about making real improvements that users can actually feel.
Let's walk through a common and frustrating problem: an image gallery that stutters and hangs as you scroll. It's a classic performance headache where the page becomes unresponsive, creating a terrible first impression. Guessing the cause is a waste of time; we need data to guide our debugging in Chrome.
Recording a Performance Profile
First things first, you need to capture a recording of the problematic interaction. The Performance panel records everything the browser does during a specific period—from running JavaScript to painting pixels on the screen.
To get a clean and accurate reading, I always recommend these steps:
- Open your page in an incognito window. This ensures your browser extensions don't interfere with the profile.
- Head over to DevTools and click into the Performance panel.
- Hit the "Record" button (the little circle icon) to start profiling.
- Now, perform the action that triggers the slowness—in our case, scroll quickly through that janky image gallery.
- Click "Stop" to end the recording.
After a moment, DevTools will spit out a detailed timeline of everything that just happened. I know it can look intimidating at first, but we’ll just focus on the important parts to find our culprit.
Decoding the Flame Chart
The centerpiece of the Performance panel is the flame chart. This visual graph shows you exactly what was happening on the main thread over time. What you're looking for are the tall, wide blocks. These are "long tasks"—any script or process that takes more than 50 milliseconds to run.
These are almost always the source of jank because they block the browser from doing other important work, like, you know, responding to the user.
In our image gallery scenario, you'd scan the flame chart for wide, yellow blocks labeled "Scripting." Hovering over these will reveal the specific JavaScript function that was running. You might find a poorly optimized image-loading script that's doing way too much work at once, hogging the main thread and causing that scrolling stutter.
The goal isn’t to eliminate every task. It's to break up those long tasks into smaller, shorter chunks. This gives the browser breathing room to stay responsive to user actions, even while your code is chugging away.
This focus on real-world user interaction is becoming more central to Chrome's tooling. The Performance panel now prioritizes insights relevant to the 75th percentile of Chrome User Experience Report (CrUX) data, alerting developers to issues impacting their audience the most. This shift acknowledges that poor performance directly correlates with user abandonment rates that can exceed 30%, as users globally expect fast, smooth experiences. You can find out more about these new insights on real-world data integration on YouTube.
Identifying Rendering and Layout Bottlenecks
Beyond just scripting, the Performance panel helps you spot other common speed bumps. Look for wide purple blocks, which indicate Rendering and Layout work. A "Layout Shift" happens when an element on the page unexpectedly moves, which is jarring for users and kills your Core Web Vitals score.
Our slow gallery might be suffering from this if the images are loading without defined dimensions. As each one downloads, it pushes other content around, forcing the browser to recalculate the page layout over and over. The flame chart will expose this as a series of expensive "Layout" events.
Often, the fix is as simple as adding width and height attributes to your <img> tags. This allows the browser to reserve the correct amount of space before the image even loads. For those managing complex data dashboards, you can also explore our guide on mastering Grafana data sources for more on handling large data loads efficiently.
Finally, check the "Timings" track for key metrics like First Contentful Paint (FCP) and Largest Contentful Paint (LCP). If your LCP—which is often a large hero image—is taking forever to appear, it’s a dead giveaway that your image assets are too large and need to be optimized. The Performance panel gives you the hard evidence you need to stop guessing and start fixing what truly matters.
Go Beyond the Basics with Debugging Extensions
While the built-in Chrome DevTools are powerful on their own, they’re not the end of the story. A whole ecosystem of browser extensions exists to supercharge your workflow, giving you specialized tools that plug directly into the frameworks and libraries you use every single day.
Think of it like adding custom attachments to your standard toolkit. Each one is designed for a specific job, helping you build a personalized debugging environment that fits your tech stack perfectly. This is how you integrate specialized diagnostics right into your browser, helping you squash bugs way faster than you could with a generic setup.
Framework-Specific Debugging Tools
If you're working with a modern JavaScript framework like React, Vue, or Angular, their dedicated developer tools extensions are non-negotiable. Seriously, just install them now. They offer a window into your application's structure and state that's impossible to get from the standard Elements or Sources panels.
Let’s say you're trying to debug a React app. Without the right extension, you’re just staring at a minified JavaScript bundle and a confusing sea of <div> tags in the Elements panel. Good luck figuring out how your components relate to one another or what their current state is.
The React Developer Tools extension completely changes the game. It adds a "Components" tab to your DevTools that shows you a clean tree view of your actual component hierarchy. You can click on any component to inspect its props, state, and hooks in real-time.
Being able to see and edit component props and state on the fly is a massive time-saver. You can test edge cases or trigger UI changes without ever needing to write a single
console.logor refresh the page.
Imagine a UserProfile component isn't showing the user's name correctly. Instead of digging through code, you can pop open= the Components tab, find UserProfile, and check its user prop. You might see instantly that the name property is null, pointing you directly to the source of the problem.
Essential Utilities for Every Developer
Beyond framework-specific tools, several general-purpose extensions can make your daily debugging tasks significantly smoother. These are the utilities that handle common pain points and add functionality that feels like it should have been part of DevTools all along.
Here are a few categories of extensions worth adding to your arsenal:
- JSON Formatters: When you're inspecting an API response in the Network tab, the raw JSON is often a single, unreadable line of text. An extension like JSON Viewer automatically pretty-prints it, adding color-coding and collapsible sections that make even complex data easy to navigate.
- Accessibility Audits: Tools like the Axe DevTools extension let you run accessibility scans directly on your page. It flags issues like missing alt text, poor color contrast, and incorrect ARIA roles, giving you specific guidance on how to fix them.
- API Clients: Extensions such as Postman or Insomnia provide a complete interface for testing APIs without leaving your browser. You can build, send, and analyze complex HTTP requests—invaluable for debugging API integrations.
As of 2025, there are over 20 widely recommended Chrome debugger extensions that perfectly complement DevTools. In fact, developer reports show that using a curated set of these tools can slash debugging times by up to 35%-40% by specializing diagnostics for specific tasks. You can learn more about these powerful bug-fixing extensions on userback.io.
By carefully picking a few key extensions, you build a much more efficient and powerful debugging environment tailored to what you actually work on.
Quick Answers to Common Debugging Headaches
Even when you know your way around DevTools, some problems just stop you in your tracks. Let’s tackle a few of the tricky situations that pop up on real projects—the kind of stuff that goes beyond the everyday workflow. Having a quick solution for these can save you a ton of time and frustration.
How Can I Debug JavaScript on My Phone?
This is a classic one. You've got a bug that only shows up on a physical Android device, and you're flying blind. The answer is Remote Debugging, and it's less painful to set up than you might think. It essentially mirrors your phone's browser session into a full DevTools window on your desktop.
First, you'll need to enable "USB debugging" in your phone's developer options. Once that's sorted, plug your phone into your computer with a USB cable.
Then, just pop open= a new tab in desktop Chrome and head over to chrome://inspect#devices.
You should see your phone listed right there, along with any tabs you have open. Find the tab you want to debug, click "inspect," and a new DevTools window will launch. That's it! You now have a live link to your phone's browser, letting you inspect the DOM, check the console, and set breakpoints just like you would locally.
What's the Best Way to Debug Asynchronous Code?
Debugging async/await and Promises used to be a complete nightmare of cryptic stack traces. Thankfully, those days are mostly behind us. The Sources panel now handles asynchronous code beautifully.
When you pause on a breakpoint inside an async function, take a look at the Call Stack pane. Instead of a jumbled mess, it now shows you the full logical path that got you there, even across asynchronous gaps. It's like a perfect breadcrumb trail of await calls, showing you exactly which function kicked off the chain of events.
Pro Tip: Look for the "Step over next await" button in the debugger controls. It lets you jump straight to the code that runs after a promise resolves, skipping all the internal browser machinery. It’s a huge time-saver for keeping your focus on your own logic.
This feature turns what was once a confusing mess into a clear, step-by-step investigation.
Can I Actually Edit and Save Files Directly in DevTools?
Yes, and once you start doing this, you'll wonder how you ever lived without it.
For quick-and-dirty CSS changes, you can always edit styles in the Elements panel. It’s perfect for experimenting, but remember those changes are temporary and vanish the second you reload the page.
For permanent edits that actually save to your local files, you need to set up a Workspace. This powerful feature in the Sources panel lets you map a network resource (like your app.js or styles.css) directly to the corresponding file on your computer.
Here’s how you set it up:
- Head over to the Sources panel.
- In the left-hand pane, click the Filesystem tab.
- Click "Add folder to workspace" and choose your local project folder.
- Chrome will ask for file system access—you'll need to grant it.
- Finally, right-click on a file served to the browser (like a CSS file under the Page tab) and select "Map to file system resource." From there, just pick the matching local file.
Once that connection is made, any change you make to that file inside DevTools is instantly saved to your local disk. It creates a seamless live-editing workflow, letting you debug, code, and save all in one place.
At FindMCPServers, we're focused on providing the tools and resources developers need to build better, more connected AI applications. Explore our platform to discover MCP servers that can streamline your development workflow.